Introduction To CSS3 [my article on devmix]


متابعى مدونة فريق ديف ميكس الأعزاء .. بعد التحية .. نقدم لكم مجموعة من المقالات فى السي اس اس 3 متابعة لسلسلة الويب والتى تم الاعلان عنها منذ فترة وقررنا الكتابة فى هذا الجزء باللغة العربية تقديرا لرغبة القراء واثراءا لمحتوى اللغة العربية على الانترنت ونتمنى ان تنال اعجابكم

Top


مقدمة الى الجحيم بهذه المتصفحات .. كلمة قالها جيفيري زيلدمان سنة 2001 ومن بعدها بدأت ثورة التطوير الحقيقي لمتصفحات الويب والسبب فى ذلك هو تحول مصممي صفحات الويب لاستخدام السي اس اس 1 فى اشياء اكثر من الالوان والخطوط واصبحت المتصفحات فقيرة لدعم الخصائص التى يرديها المصممون. فى 2006 بدأ الكلام عن دعم السي اس اس يقل حيث ان معظم المشكلات التى كانت تظهر ، تم حلها من قبل المتصفحات واصبحت المتصفحات تتطور بشكل اسرع خصوصا فايرفوكس وسفاري ، وفى نهاية الامر .. المتصفحات تتطور بتطور لغات الويب الخاصة بالديزاين مثلا السي اس اس والاتش تي ام ال. Top


بعض الاحصائيات عن دعم المتصفحات للسي اس س 3 لم تدعم كل المتصفحات السي اس اس 3 بشكل كامل وهناك ما يدعم بعض الخصائص ولا يدغم بعضها واليكم جدول بدعم المتصفحات لبعض الخصائص الجديدة فى سي اس اس 3 اذن لا يزال الدعم مستمر فى الاصدارات القادمة من المتصفحات Top


ما الجديد فى السي اس اس 3 ؟ Borders هناك الكثير والكثير جديد فى السي اس اس 3 مما سهل مهمة مصممي المواقع ومنها ميزة الحدود فتستطيع إختصار ما كنت تفعله في الإصدارة الثانية إذا كنت تريد عمل حواف دائرية لصندوق عن طريق الحدود في السي اس اس أو إستبدال الحدود بصورة من الصور كما هو موضوح بالصورة:

ففى الاصدار الثانى كنا نستخدم اربع صور مختلفة للحواف الاربعة داخل صندوق ملون عادي ولكن فى الاصار الجديد تستطيع ببساطة ان تفعل نفس الموضوع وبكفاءة اكبر عن طريق ميزة border-radius واللى تمكنك من عمل حواف دائرية بسهولة جرب لكود التالي

HTML code

</pre>
<div id="Box">
<h1>عنوان</h1>
نص مكتوب للتجربة</div>
<pre>

CSS code

#box{
text-align:right;
margin: 10px auto;
padding: 7px;
width: 238px;
height: auto;
background-color: #e6e9ed;
border: 1px solid #666666;
border-radius: 10px;
-moz-border-radius: 10px;
-webkit-border-radius: 10px;
-o-border-radius: 10px;
-opera-border-radius: 10px;
}

RGB Color system RGB بالتأكيد أسهل بكثير مما سبق ومن الجديد ايضا خاصية تغيير الالوان بصيغة ال انظر المثال التالى ايضا ينطبق نفس الشكل فى الانظمة الاخرى مثل (CMYK,HSL,HSLA) Fonts من الاشياء الجديدة والمفيدة جدا استخدام فونتس جديدة باستخدام ميزة جديدة اسمها @font-face وتستخدمها بالشكل التالى CSS code

@font-face {
font-family: "devmixfont";
src: url('atlandsketchesbb_reg.TTF');
}
h1 {
font-family: "devmixfont";
color: #3e87f5;
font-size:100px;
}

HTML code

</pre>
<h1>DevMix Team</h1>
<pre>
DevMix Team was founded in February 2011 and it is the best
teamwork in Mansoura Universty collected by students, we are the best

فتكون النتيجة كالتالى ملحوظة: تقدر تنزل اى فونت من هنا Shadow إضافة جديدة وجميلة تساعد على وضع ظل للنصوص والعناصر أو الصناديق الاتش تي ام ال أيضاً ، هذه الظلال يكون تكوينها عن طريق خاصية box-shadow و text-shadow ويمكن حساب قيمها بهذه الطريقة: مصدر الصورة هيا بنا نرى مثال ونتيجة له ، جرب الكود التالى HTML code

</pre>
<div id="Box">
<h1>فريق ديف ميكس</h1>
فريق تقني يقدم خدمات للمهتمين بمجال تكنولوجيا المعلومات .. رغم نشأته الحديثة فى فبراير 2011 الا انه اثبت كفاءته وكفاءة اعضاءه</div>
<pre>

CSS code

#box {
padding: 13px;
margin: 0 auto;
width: 450px;
text-align: left;
background-color: #e9ecf2;
-moz-box-shadow: 7px 7px 10px #9c9c9c;
-webkit-box-shadow: 7px 7px 10px #9c9c9c;
-o-box-shadow: 7px 7px 10px #9c9c9c;
}

وتكون النتيجة عمل ظل للصندوق كما فى الصورة التالية اما عن عمل ظل للكلام والذي يعطى تنسيقا متميز للكلام انظرالكود والنتيحجة التاليين CSS code

h1, p {
text-shadow: 3px 2px 7px #9f9f9f;
}

HTML code

</pre>
<h1>فريق ديف ميكس</h1>
<pre>فريق تقني يقدم خدمات للمهتمين بمجال تكنولوجيا المعلومات
 .. رغم نشأته الحديثة فى فبراير 2011 الا انه اثبت كفاءته وكفاءة اعضاءه

فتكون نتيجة هذا الكود كالتالى
يوجد الكثير من الخصائص الجديدة الاخرى والتى سوف يثم مناقشتها فى الدروس والمقالات القادمة باذن لله مثل

  • Transitions
  • opacity
  • Multiple Backgrounds
  • Animation
  • and more …
Top

ملاحظات لابد ان تأخد فى الاعتبار
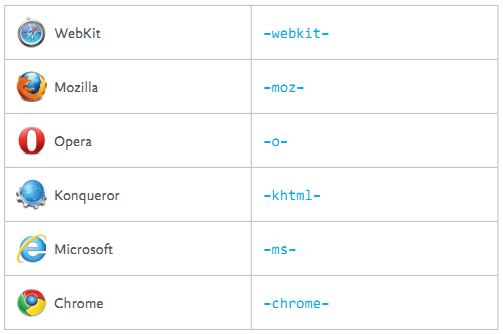
لم يدعم كل المنتصفحات كل الخصائص بنفس الطريقة لذلك فى كتابة السي اس اس 3 يعتبر اختلاف دعمهم للخصائص احدالعيوب والتى تكلفك كتابة الخاصية اكثر من مرة ولعلكم رأيتم اكثر من مرة فى الامثلة كتابة الخاصية ببعض الحروف قبلها انظر الصورة بكل متصفح وامامه الكلمة المختصرة المستخدمة فى السي اس اس 3 مع خصائصها

border-radius ومثال على خاصية الحدود الدائرية

-moz-border-radius:10px;
-o-border-radius:10px;
-webkit-border-radius:10px;
-khtml-border-radius:10px;
-ms-border-radius:10px;
-chrome-border-radius:10px;

وفى النهاية اتمنى ان اكون قد اوصلتك لبعض خصائص السي اس اس 3 المهمة وعرضت عليك مقدمة تجعلك تستخدم السي اس اس 3 اليوم قبل غدا وانتظروا باقى مقالاتنا فى القريب العاجل باذن الله ننتظر تعليقاتكم ومقترحاتكم .. بالتوفيق:)

كتبت فى الاصل فى مدونة فريق ديف ميكس

HTML5 – Fantastic Forms [my article on DevMix]


————————————————————————————————————————————

1- Web Forms before HTML5

Everybody knows about web forms, right? Make a <form>, add a few <input type=”text” /> elements and maybe an <input type=”password” />, finish it off with an <input type=”submit” /> button, and you’re done.

try it now:

  <form>
    username: <input type="text" name="username"/>
    password: <input type="password" name="pass"/>
    <input type="submit" name="submit" value="submit"/>
  </form>

With these few types of elements in the above code, you can make a login form like this :

it’s so classic .., the following table collect the input types in HTML4 :

ok , let’s make more sense with HTML5 🙂

————————————————————————————————————————————

2- Dive into HTML5 Form of Madness

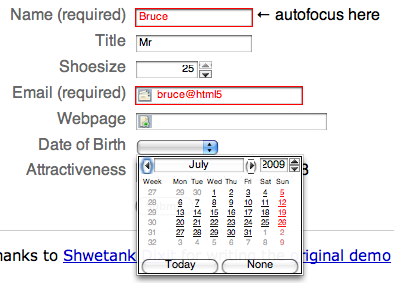
Yes, it’s a form of madness when you make some thing which was taking hours of your time only in a moment with one line or with adding one attribute.. no more words to say, only look at the following examples of forms wrtten in HTML5 and then let’s learn each new feature

example1

example2

example3 – this example uses also CSS3 🙂

ok let’s explore the features 😀

————————————————————————————————————————————

3- PlaceHolder Text

The first improvement HTML5 brings to web forms is the ability to set placeholder text in an input field. Placeholder text is displayed inside the input field as long as the field is empty and not focused. As soon as you click on (or tab to) the input field, the placeholder text disappears.

Create a new HTML form and add a form element inside the body element as follow :

<html>
    <head>
        <title>DevMix Web Series</title>
    </head>
    <body>
        <form>

        </form>
    </body>
</html>

then, start with the first new feature today write this inside the form element

<form>
  <input name="q" placeholder="Search Bookmarks and History">
  <input type="submit" value="Search">
</form>

then the result simply will be as follow:

it’s done now 😀

————————————————————————————————————————————

4- Autofocus Fields

Google is the most famous search engine all over the world .. because they care of the HCI that make the visitor come again, and from these aspects of HCI when you login to Google.com the design is very simple and the search box is autofocused, google used to use javascript for that till HTML5 come to life .. which make this in a very simple way.

ok, add more than element in a form like this:

<form>
    <input type="text" />
    <input type="text" />
    <input type="text" />
</form>

and the result will be as follow (no text is focused when running the page) :

and to add the autofocus feature you will make the following change:

<form>
    <input type="text" />
    <input type="text" autofocus/>
    <input type="text" />
</form>

try it your self and you will get the centered text focused .. as you see the autofocus attribute is a naked attribute that take no value

very simple 🙂

————————————————————————————————————————————

5- E-mail Addresses

HTML5 looks for the most important types that we were using javascript for and it might be quit complicated and make it easy for us, one of them is the Email address type, all browsers support that type.

using the Email type like the following:

<form>
   <input type="email">
   <input type="submit" value="Go">
</form>

then try to write any thing without the structure of the email addresses and press the Go button and the result will be as follow:

it makes a validation for the entered text .. automatically 🙂

Make sense, doesn’t it ?

————————————————————————————————————————————

6- Web Addresses

the same as the Email addresses making a validation .. try it your self

<form>
    <input type="url">
    <input type="submit" value="Go">
</form>

and if you enter a not valid URL this message will appear

————————————————————————————————————————————

7- Numbers As Spinboxes

My point is, you don’t often ask for “just a number” It’s more likely that you’ll ask for a number in a particular range, and you may only want certain kinds of numbers within that range—maybe whole numbers but not fractions or decimals, or something more esoteric like numbers divisible by 10. HTML5 has you covered. Let’s look at an example:

<form
      <input type="number"
       min="0"
       max="10"
       step="2"
       value="6">
</form>

this shot from Opera browser

it represents the numbers good ..

————————————————————————————————————————————

8- Numbers As Sliders

The same as the number as spinbox but with another GUI (a slider), the example will clear it.

try it your self:

<form>
    <input type="range"
       min="0"
       max="10"
       step="2"
       value="6">
</form>

and the result will be:

i think it makes the whole difference.. 🙂

————————————————————————————————————————————

9- Data Pickers

HTML5 finally defines a way to include a native date picker control without having to script it yourself. In fact, it defines six: date, month, week, time, date + time, and date + time – timezone.

supporting the data picker in browsers

Opera give the support for the datapicker in all flavors.. you will find one of them if you try this code out:

<form>
    <input type="datetime"/>
</form>

this will give the following result only on Opera:

there are a lot of the Data Pickers .. explore them your self 😉

————————————————————————————————————————————

10- Search Boxes

Try this out:

<form>
  <input name="q" type="search">
  <input type="submit" value="Find">
</form>

this make some special features to this text box, like a small x in the end of the text box when clicking on it, it clears the box, this appear in the Safari and the chrome browsers.

the result will be as follow:

using the CSS you can change the shape of the textbox as you like..

————————————————————————————————————————————

11- Find more..

this article is a push for you to explore the fantastic forms in HTML5 not collecting all features .. you can get the others and read more from these links .. thanks

i’m waiting for your feeds 🙂

written in developersmix blog